
POST 방식
//9_method.js

const http = require("http");
const fs = require("fs");
const url = require("url");
const qs = require("querystring");

http.createServer((req, res) => {
	//console.log(req);
	console.log(req.url);

	//req.url은 경로부터 시작되는 URL이다.
	//전체 URL을 가져오려면 아래와 같이 hostname + port 를 같이 넣어줘야 한다.
	const myUrl = new URL(req.url, "http://localhost:8080");

	if(req.url ==='/') {
		fs.readFile(__dirname + "/input.html", (err,data) => {
			res.writeHead(200, {"content-type": "text/html, charset=utf-8"});
			res.end(data);
		})
	}
	else if(myUrl.pathname === "/input.do") {
		//메소드 정보는 요청 객체의 메소드 속성에 문자열 형태로 저장되어 있다.
		if(req.method === "GET") {
			const params = myUrl.searchParams;
			//console.log(params);	//URLSearchParams { 'name' => 'kakaroo', 'age' => '20' }
			console.log("GET: ",params.get("uname"), params.get("uage"));	//kakaroo 20
		}
		else if(req.method === "POST") {
			/*req.on("data", //요청 메시지 바디에 수신된 데이터가 존재할 경우
				   (chunk) => {
					//chunk 안에는 uname=kakakroo&uage=20 바이너리 정보가 들어있다
					const p = new URLSearchParams(chunk.toString());
					console.log(p.get("uname"), p.get("uage")) //kakaroo 20

					//큰 data가 들어오는 경우 문제가 된다.
			});*/
			const buf = [];
			req.on("data", //요청 메시지 바디에 수신된 데이터가 존재할 경우
			   (chunk) => {
				buf.push(chunk);
			});
			req.on("end", () => {
				const data = Buffer.concat(buf).toString();
				const p = new URLSearchParams(data);
				console.log(p.get("uname"), p.get("uage"));
			});
		}
		res.writeHead(200, {"content-type": "text/html, charset=utf-8"});
		res.end();
	}

}).listen(8080);
동적인 웹페이지 예제
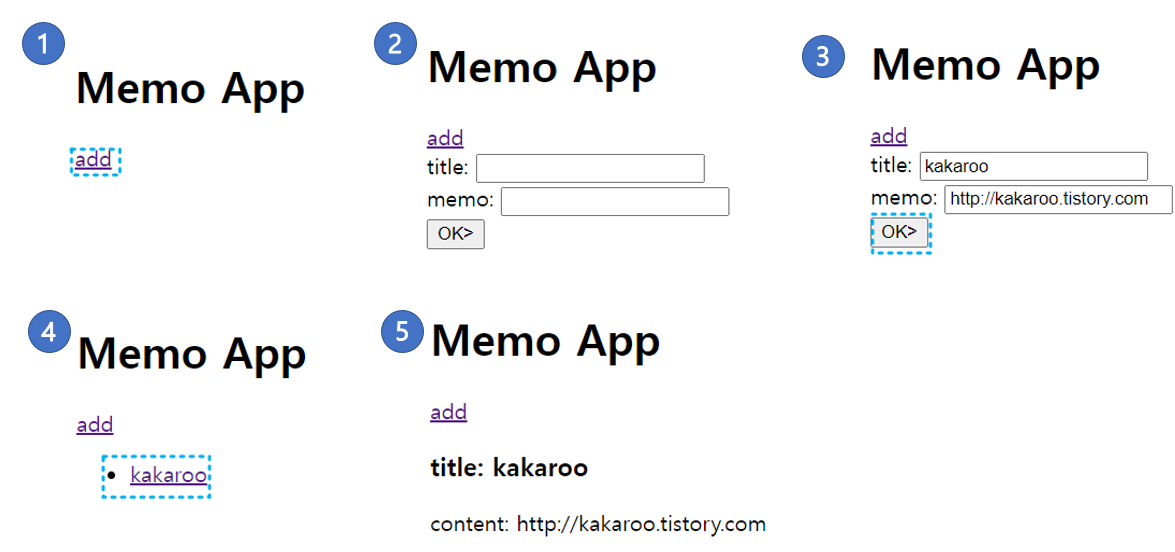
//4일차 - main.js
//Memo(타이틀/컨텐츠) 추가하는 예제
//추가된 메모는 타이틀.txt 로 저장되고
//저장된 파일은 목록으로 보임
//목록을 누르면 View/Edit

const http = require("http");
const fs = require("fs");

//파일목록을 HTML 코드로 변환하는 함수
const templateList = fileList => {
	let html = "<ul>";	//ul: unordered list
	for (const fname of fileList) {
		html += `<li><a href="/display?id=${fname}">${fname}</a></li>`;	//li: list item
	}
	html += "</ul>";
	return html;
}

//인덱스 페이지 생성함수
const templateHTML = (fileList, body) => {
	return `
	<!DOCTYPE html>
	<html>
		<head><meta charset="utf-8"></head>
		<body>
			<h1>Memo App</h1>
			<a href="/add"> add </a>
			${fileList}
			${body}
		</body>
	</html>`;
};

http.createServer((req, res) => {

	//req.url은 경로부터 시작되는 URL이다.
	//전체 URL을 가져오려면 아래와 같이 hostname + port 를 같이 넣어줘야 한다.
	const url = new URL(req.url, "http://localhost:8080");
	console.log("pathname:", url.pathname, ", search:", url.search);

	if(url.pathname ==='/') {
		//파일의 목록을 읽어옵니다.
		fs.readdir(__dirname + "/data", (err, data) => {
			//HTML화면을 동적으로 생성하는 코드
			const listHtml = templateList(data);
			const html = templateHTML(listHtml, "");

			res.writeHead(200, {"content-type": "text/html, charset=utf-8"});
			res.end(html);
		});
	}
	else if(url.pathname ==="/display") {
		// /display?id=hello.txt
		const file =  url.searchParams.get("id");
		const filePath = __dirname + "/data/" + file;
		console.log(filePath);

		fs.readFile(filePath, "utf-8", (err,data) => {
			const html = templateHTML("", `<h3>title: ${file}</h3>content: ${data}`);
			res.writeHead(200, {"content-type": "text/html, charset=utf-8"});
			res.end(html);
		});
	}
	else if(url.pathname === "/add") {
		const form = `<form action="/add.do" method="GET">
				title: <input type="text" name="title"><br>
				memo: <input type="text" name="content"><br>
				<button>OK></button></form>`;

		const html = templateHTML("", form);
		res.writeHead(200, {"content-type": "text/html, charset=utf-8"});
		res.end(html);
	}
	else if(url.pathname ==="/add.do") {
		const title = url.searchParams.get("title");
		const content = url.searchParams.get("content");

		fs.writeFile(__dirname + "/data/" + title, content, err => {
			if(err) throw err;
			console.log("writeFile ok!");
			//res.writeHead(200, {"content-type": "text/html, charset=utf-8"});
			//res.end("OK");
		})

		//현재 사이트의 특정페이지로 리다이렉션 하는 방법
		res.writeHead(302, {"Location": "/"});
		res.end();
	}

}).listen(8080);

console.log("server running...");
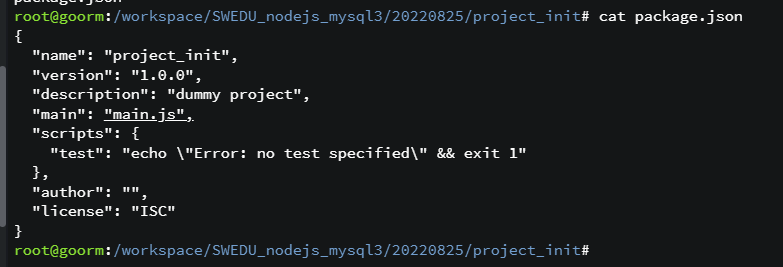
NPM
Node PAckage Manager의 약자로 Node.js에서 사용할 수 있는 모듈을 패키지화하여 이를 모아둔 저장소 역할과 패키지 설치 및 관리를 위한 명령어
사용방법:
1. 패키지 설치: npm install [-g] < 패키지명> //-g 옵션 : 전역으로 설치
ex) cd emoji_test
npm install node-emoji
디렉토리 내에 node_modules 라는 디렉토리가 자동으로 생성되고 이 안에 패키지가 설치된다.
지역으로 설치된 패키지는 해당 프로젝트 내에서만 사용가능하다.

사용 예)

하나의 모듈에 다수의 패키지를 사용하다 보면 문제점이 있다.
외부 모듈도 업데이트가 자주 일어남 버전관리가 제대로 안 되어 해당 패키지가 제대로 동작안 되는 경우가 있음
모듈간에 디펜던시가 높음
=> package.json 를 보면 알 수 있다.
<프로젝트 초기화>
npm init
-> 모듈을 배포하기 전에 초기화가 필요하다.
npm install node-emoji 를 하고 나면 아래와 같이 dependency 가 추가되었다.
배포되는 모듈에 어떤 모듈이 dependency 가 있는지 알 수 있다.
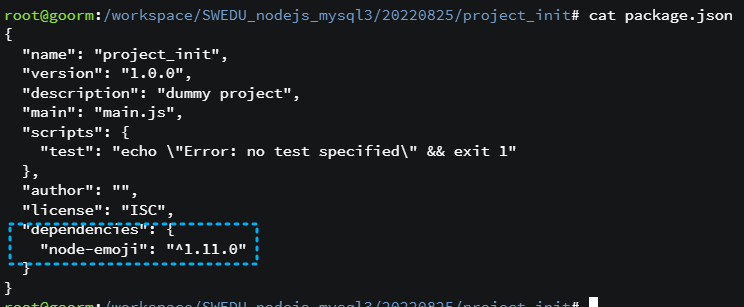
package.json 부분에 아래 추가

//project_init/main.js

const emoji = require("node-emoji").emoji
console.log(emoji.heart);
npm 실행
#npm run 스크립트 명

위에서 동적인 html 코드를 직접 작성해서 해 보았다. EJS 라는 모듈이 그 역할을 하는데, 그 모듈을 설치해서 이용해 보겠다.
EJS(Embedded JavaScript templates) : 자바스크립트를 사용하여 동적으로 HTML 코드를 생성할 수 있는 간단한 템플릿 언어 -> 자바의 JSP 개념
EJS -- Embedded JavaScript templates
Simple syntax JavaScript code in simple, straightforward scriptlet tags. Just write JavaScript that emits the HTML you want, and get the job done!
ejs.co
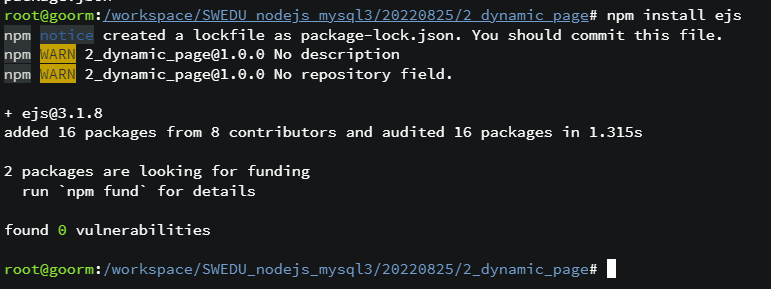
모듈 설치
# mkdir 2_dynamic_project
# cd 2_dynamic_project
# npm init
# npm install ejs
# EJS 문법(EJS 파일에서 작성해야 한다. ex) index.ejs
1. 변수 치환: <%= 변수명 %> -> 자바스크립트 내에 존재하는 값을 출력할 때 쓰임
2. 조건에 따른 분기
<% if (조건식1) { %>
조건식1이 참일때 사용할 HTML 코드 <% } %>
<% elif (조건식2) { %>
조건식2가 참일때 사용할 HTML 코드
...
<% } else { %>
<% } %>
<EJS 파일 생성>
<!-- index.ejs -->
<!DOCTYPE html>
<html>
	<head> <meta charset="utf-8"> </head>
	<body>
		<h1> 구구단 2단</h1>
		<% for(let num =1; num < 10; num++) { %>
			2 X <%= num %> = <%= 2*num %><br>
		<% } %>
	</body>
</html>
//2_dynamic_page/main.js
const http = require("http");
const fs = require("fs");
const ejs = require("ejs");

http.createServer((req, res) => {
	fs.readFile("./index.ejs", "utf-8", (err,data) => {
		res.writeHeader(200, {"content-type": "text/html, charset=utf-8"});
		res.end(ejs.render(data));
	})
}).listen(8080);
console.log("server running...");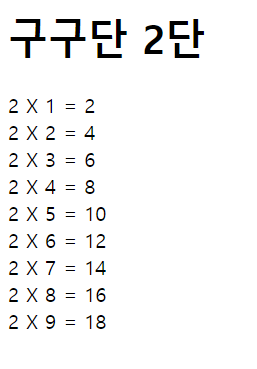
EJS 처리 방법 2
//value_test.js
const ejs = require("ejs");

const fruits = ["apple", "banana", "cherry", "durian"];

const ejsFile = `<h1><%= fruitList.join(", "); %></h1>`

//{fruitList: fruits} => key는 ejs에서 꺼내어 value로 치환
const html = ejs.render(ejsFile, {fruitList: fruits});

console.log(html);
매개변수(query) 부분을 값으로 받아서 처리하는 예제로 응용할 수 있다.
https://kakaroo.swedu-run.lge.com/?dan=8
//2_dynamic_page/main.js
const http = require("http");
const fs = require("fs");
const ejs = require("ejs");

http.createServer((req, res) => {
	const url = new URL(req.url, "http://localhost:8080");
	console.log("pathname:", url.pathname, ", search:", url.search);
	const value = url.searchParams.get("dan");

	//case 1
	/*fs.readFile("./index.ejs", "utf-8", (err,data) => {
		res.writeHeader(200, {"content-type": "text/html, charset=utf-8"});
		res.end(ejs.render(data, {dan:value}));
	})*/

	//case 2
	const ejsFile = `<head> <meta charset="utf-8"> </head>
	<body>
	<h1> 구구단 <%= dan %>단</h1>
		<% for(let num =1; num < 10; num++) { %>
			<%= dan %> X <%= num %> = <%= dan*num %><br>
		<% } %>
	</body>`;
	res.writeHeader(200, {"content-type": "text/html, charset=utf-8"});
		res.end(ejs.render(ejsFile, {dan:value}));

}).listen(8080);
console.log("server running...");
위 동적 메모 프로그램을 EJS 형태로 변경하는 예
<index.ejs>
<!-- index.ejs -->
<!DOCTYPE html>
<html>
	<head> <meta charset="utf-8"> </head>
	<body>
		<h1> Memo App</h1>
		<a href="/add"> add</a>
		<ul>
			<% for (const fname of fileList) { %>
				<li><a href="/display?id=<%= fname %>"> <%= fname %> </a></li>
			<% } %>
		</ul>

		<% if( body != "" ) { %>
			<h3>title: <%= mytitle %> </h3> content: <%= mydata %>
		<% } %>

		<% if( add === "add" ) { %>
			<form action="/add.do" method="GET">
				title: <input type="text" name="title"><br>
				memo: <input type="text" name="content"><br>
				<button>OK></button></form>
		<% } %>

	</body>
</html>
//4일차 - main.js
//Memo(타이틀/컨텐츠) 추가하는 예제
//추가된 메모는 타이틀.txt 로 저장되고
//저장된 파일은 목록으로 보임
//목록을 누르면 View/Edit

const http = require("http");
const fs = require("fs");
const ejs = require("ejs");

http.createServer((req, res) => {

	//req.url은 경로부터 시작되는 URL이다.
	//전체 URL을 가져오려면 아래와 같이 hostname + port 를 같이 넣어줘야 한다.
	const url = new URL(req.url, "http://localhost:8080");
	console.log("pathname:", url.pathname, ", search:", url.search);

	if(url.pathname ==='/') {
		//파일의 목록을 읽어옵니다.
		fs.readdir(__dirname + "/data", (err, files) => {
			//HTML화면을 동적으로 생성하는 코드
			//const listHtml = templateList(data);
			//const html = templateHTML(listHtml, "");
			//res.writeHead(200, {"content-type": "text/html, charset=utf-8"});
			//res.end(html);
			fs.readFile("./index.ejs", "utf-8", (err, dataEjs) => {
				res.writeHeader(200, {"content-type": "text/html, charset=utf-8"});
				res.end(ejs.render(dataEjs, {fileList:files, body:"", add:"", mytitle:"", mydata:""}));
			});
		});
	}
	else if(url.pathname ==="/display") {
		// /display?id=hello.txt
		const file =  url.searchParams.get("id");
		const filePath = __dirname + "/data/" + file;
		console.log(filePath);

		fs.readFile(filePath, "utf-8", (err, data) => {
			//const html = templateHTML("", `<h3>title: ${file}</h3>content: ${data}`);
			//res.writeHead(200, {"content-type": "text/html, charset=utf-8"});
			//res.end(html);
			console.log("content:", data);
			fs.readFile("./index.ejs", "utf-8", (err, dataEjs) => {
				res.writeHeader(200, {"content-type": "text/html, charset=utf-8"});
				res.end(ejs.render(dataEjs, {fileList:"", body:"body", add:"", mytitle:file, mydata:data}));
			});
		});
	}
	else if(url.pathname === "/add") {
		/*const form = `<form action="/add.do" method="GET">
				title: <input type="text" name="title"><br>
				memo: <input type="text" name="content"><br>
				<button>OK></button></form>`;

		const html = templateHTML("", form);
		res.writeHead(200, {"content-type": "text/html, charset=utf-8"});
		res.end(html);*/
		fs.readFile("./index.ejs", "utf-8", (err, dataEjs) => {
			res.writeHeader(200, {"content-type": "text/html, charset=utf-8"});
			res.end(ejs.render(dataEjs, {fileList:"", body:"", add:"add"}));
		});
	}
	else if(url.pathname ==="/add.do") {
		const title = url.searchParams.get("title");
		const content = url.searchParams.get("content");

		fs.writeFile(__dirname + "/data/" + title, content, err => {
			if(err) throw err;
			console.log("writeFile ok!");
			//res.writeHead(200, {"content-type": "text/html, charset=utf-8"});
			//res.end("OK");
		})

		//현재 사이트의 특정페이지로 리다이렉션 하는 방법
		res.writeHead(302, {"Location": "/"});
		res.end();
	}

}).listen(8080);

console.log("server running...");
-- View 를 여러개로
<!-- index.ejs -->
<!-- DOCTYPE html -->
<html>
	<head> <meta charset="utf-8"> </head>
	<body>
		<a href="/"><h1>Memo App</h1></a>
		<a href="/add">Add</a>
		<ul>
			<!-- 메모 목록을 동적으로 생성 -->
			<% for(const fname of fileList) { %>
				<li><a href="/display?id=<%= fname %>"><%= fname %></a></li>
			<% } %>
		</ul>
	</body>
</html>
<!-- display.ejs -->
<!-- DOCTYPE html -->
<html>
	<head> <meta charset="utf-8"> </head>
	<body>
		<a href="/"><h1>Memo App</h1></a>
		<p> title: <%= fname %> </p>
		<p> content: <%= content %> </p>
	</body>
</html>
<!-- add.html -->
<!-- DOCTYPE html -->
<html>
	<head> <meta charset="utf-8"> </head>
	<body>
		<a href="/"><h1>Memo App</h1></a>
		<form action=/add.do method="GET">
			title: <input type="text" name="title"><br>
			memo: <input type="text" name="content"><br>
			<button>OK</button></form>
		</form>
	</body>
</html>
//main.js
const http = require("http");
const fs = require("fs");
const ejs = require("ejs");
const path = require("path");
http.createServer((req,res) => {
const url = new URL(req.url, "http://localhost:8080");
console.log("path:", url.pathname, ", search:", url.search);
if(url.pathname === "/") {
const myFileList = fs.readdirSync(__dirname + "/data");
//EJS 파일 처리
fs.readFile(__dirname + "/index.ejs", "utf-8", (err, ejsData) => {
res.writeHeader(200, {"content-type": "text/html; charset=utf-8"});
res.end(ejs.render(ejsData, {fileList:myFileList}));
})
}
else if(url.pathname === "/display") {
//display?id==kakaroo
const fname = url.searchParams.get("id");
const filePath = path.join(__dirname + "/data/" + fname);
fs.readFile(filePath, "utf-8", (err, content) => {
fs.readFile(__dirname + "/display.ejs", "utf-8", (err, ejsData) => {
res.writeHeader(200, {"content-type": "text/html; charset=utf-8"});
res.end(ejs.render(ejsData, {fname:fname, content:content}));
})
})
}
else if(url.pathname === "/add") {
fs.readFile(__dirname +"/add.html", "utf-8", (err, data) => {
res.writeHeader(200, {"content-type": "text/html; charset=utf-8"});
res.end(data);
})
}
else if(url.pathname === "/add.do") {
const fname = url.searchParams.get("title");
const content = url.searchParams.get("content");
fs.writeFile(__dirname + "/data/" + fname, content, (err) => {
console.log("file write");
res.writeHeader(302, {"Location": "/"});
res.end();
})
}
}).listen(8080);
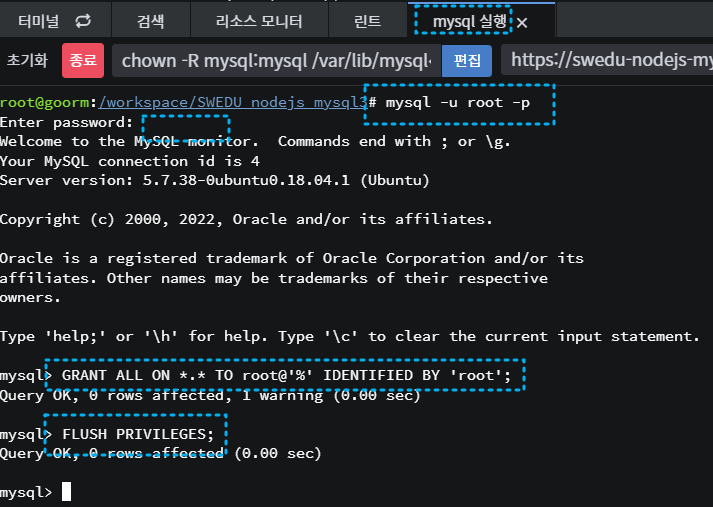
console.log("Server running..");MySQL 환경 설정
1. mysqld.cnf 파일 설정
/etc/mysql/mysql.conf.d/mysqld.cnf

2. 서비스 실행
# service mysql start

우측 상단의 mysql 실행
mysql -u root -p
GRANT ALL ON *.* TO root@'%' IDENTIFIED BY 'root';
FLUSH PRIVILEGES;


'Node.js' 카테고리의 다른 글
| Node.js - 수업 5일차 (0) | 2022.08.26 |
|---|---|
| Node.js - 수업 3일차 (0) | 2022.08.24 |
| Node.js - 수업 2일차 (0) | 2022.08.23 |
| Node.js - 수업 1일차 (0) | 2022.08.22 |