
파이프
어떤 명령어의 결과 또는 출력을 다른 명령어의 입력으로 전송하는 개념
예를 들어 현재 디렉토리의 파일 갯수를 확인하려면..
1. 현재 디렉토리의 목록을 파일로 저장 ls > ls.txt
2. wc 명령어를 사용하여 ls.txt 파일의 단어를 카운팅 -> 파일의 갯수를 확인
3. ls.txt 삭제

//2_pipe.js
const fs = require("fs");
//파이핑(piping)- 스트림들을 연결하는 개념

//파이핑을 사용하여 복사를 수행하는 코드를 만들어 보자

//1. 복사를 위한 실습 파일을 생성, 이름은 hello.txt
//2. 파일 읽기를 위한 스트림을 생성
const rs = fs.createReadStream("./hello.txt");

//3. 파일 쓰기를 위한 스트림을 생성
const ws = fs.createWriteStream("./hello2.txt");

//4. 읽기 스트림을 쓰기 스트림에 연결
rs.pipe(ws);
//3_copy.js
const fs = require("fs");

//Node.js 8부터 파일 복사를 하기 위한 새로운 함수가 추가됨
fs.copyFile("hello.txt", "hello3.txt", (err) => {
	if(err) throw err;
	console.log("done!");
})
//4_dir.js
const fs = require("fs");

//1. 디렉토리 생성하기
const dirname = "./test";
if(!fs.existsSync(dirname)) {
	fs.mkdirSync(dirname);
}

//2. 디렉토리 내용 읽기
// ->해당 디렉토리의 존재 여부
const fnames = fs.readdirSync("."); //결과는 배열에 저장되어 반환
//console.log(fnames);
fnames.forEach((fname) => {
	console.log(fname);
})

//3. 디렉토리 삭제
//동기식 함수의 경우, 오류가 발생하면 예외를 발생시킨다
//이를 처리하려면 try ~ catch 를 사용하면 된다
try {
	fs.rmdirSync("./test");	// , {recursive: true});
	//								^-- 디렉토리가 비어있지 않은 경우
    //									재귀옵션을 사용해야
}
catch(err) {
	console.log(err);
}

//4. 파일이름 변경
try {
	fs.renameSync("./hello.txt", "./hello1.txt");
}
catch(err) {
	console.log(err);
}
<module 생성 및 사용>
//calc.js

const PI = 3.141592;
const square = X => X ** 2;

//모듈안의 요소들을 외부로 공개하려면 전역 객체의 exports 속성을 사용
module.exports = {
	PI,
	square
}
//5_module.js

//실습을 하기 위해 커스텀 모듈을 작성한다
//이 때, 커스텀 모듈의 이름은 'calc.js'로 한다.

const calc = require("./calc");	//확장자 생략 가능
console.log(calc.PI);

//ES2015+ 아래처럼 사용 가능
const { PI, square } = require("./calc");
console.log(PI);
HTTP 모듈
1. http: hyper text transfer protocol 의 약자로 하이퍼 텍스트를 전송하기 위한 프로토콜
2. 하이퍼 텍스트 : 하이퍼 링크(hyper link)라는 개념을 사용하여 논리적으로 연결된 문서
ex) HTML 문서
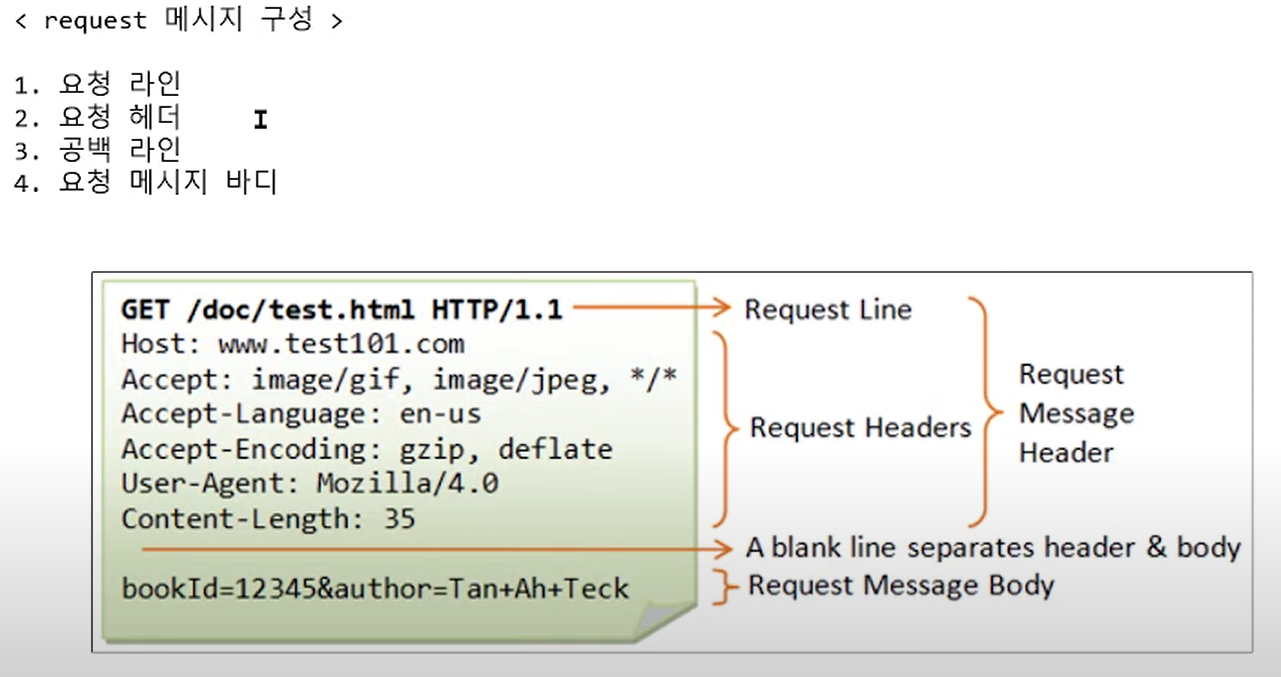
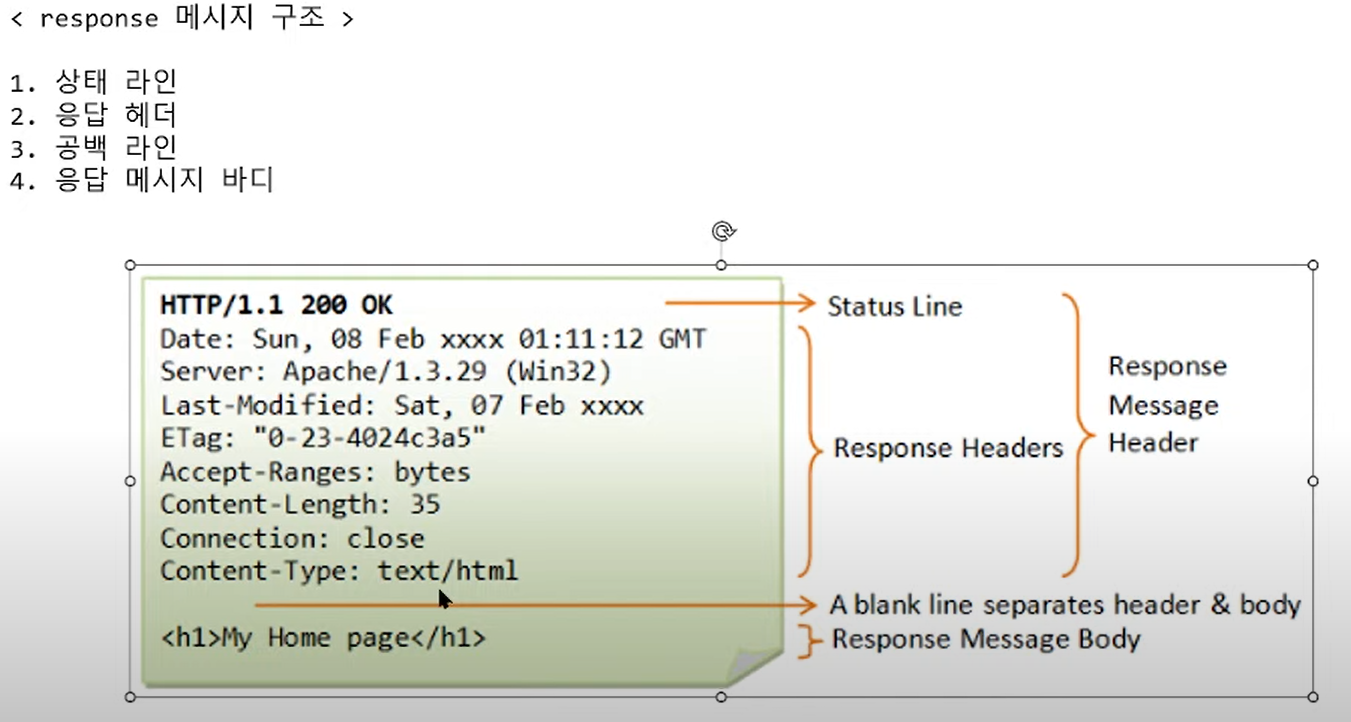
통신방법
HTTP 요청(request)과 응답(response)으로 통신
웹 브라우저 -> 주소 입력 -> 요청 -------> 웹서버 -> 응답 ----------> 웹 브라우저


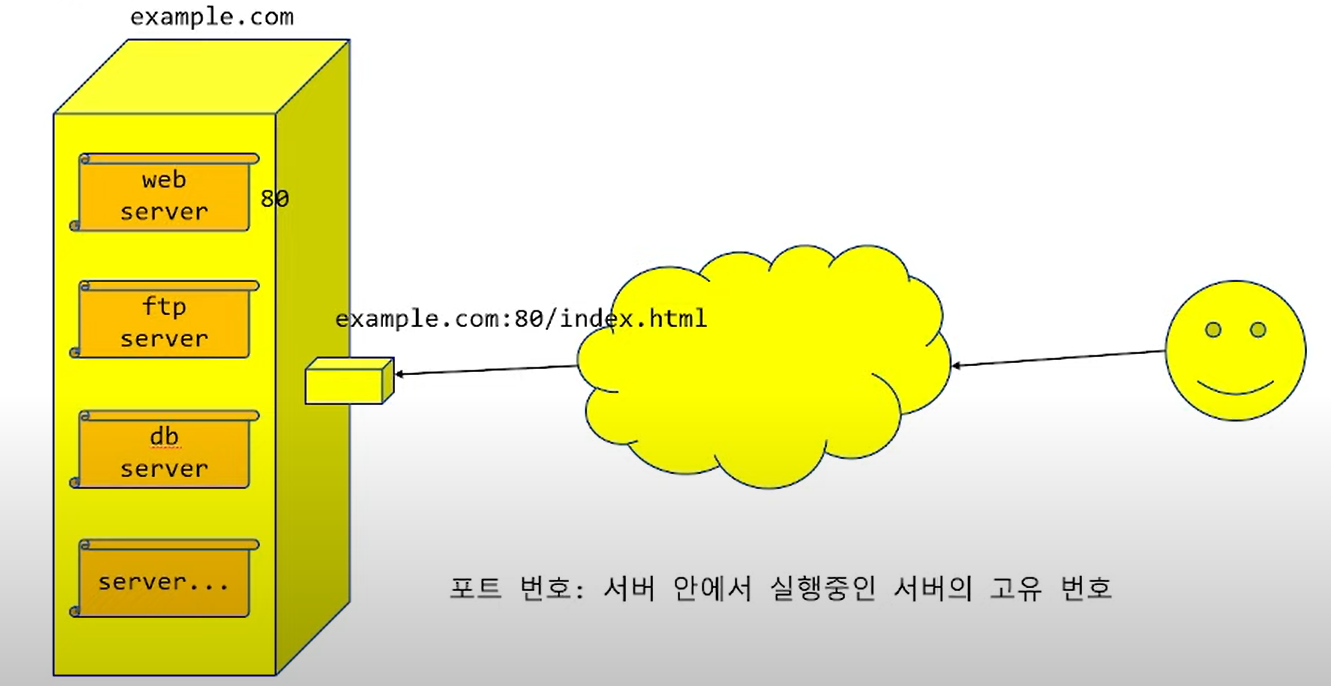
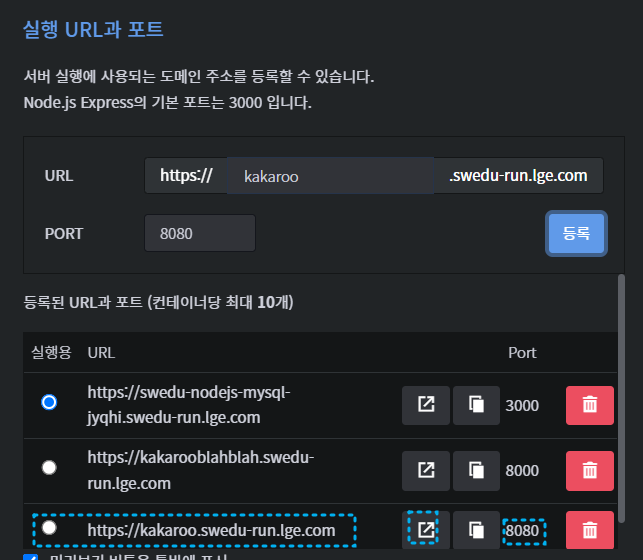
포트

HTTP 서버 생성
//6_http.js
const http = require("http");

//1- Event Listener 방식

//hello world 서버를 구현
const server = http.createServer();

server.on("request",	//클라이언트로부터 요청이 왔을 때, 발생되는 이벤트
		 (req, res) => {
	//req: 클라이언트로부터 전송된 요청 메시지에 대한 객체
	//res: 클라이언트에게 전송할 응답 메시지 객체

	//응답코드 설정 : 가장 중요
	res.statusCode = 200;	//정상적으로 처리되었음을 의미하는 상태 코드

	//응답메시지 설정 : 굳이 안 써도 된다. 응답코드에 대한 부연설명이다.
	res.statusMessage = "OK";

	//전송할 데이터의 타입을 설정한다.
	res.setHeader("content-type", "text/plain; charset=utf-8");	//charset은 옵션, 쓰는게 좋다

	//데이터를 전송한다. 이 때, 전송전에 위의 응답헤더 보다 먼저 작성하면 오류(internal server error)가 발생한다.
	res.write("hello, world");

	//서버는 반드시 클라이언트에게 전송이 완료되었다는 것을 알려주어야 한다.
	//그렇지 않으면 클라이언트(브라우저)는 대기를 하게 되고, 결국 타임아웃이 발생한다.
	//res.end();
	res.end("hello, world");	//데이터 전송 후 완료 <-- res.write 없이 짧은 데이터는 렇게도 가능
});

server.on("error",	//서버 내부에서 오류가 발생되었을 때 발생되는 이벤트
		  (err) => {
	console.log(err);
});

//서버를 실행
server.listen(8080);	//포트 번호
console.log("server running...");
서버 실행 (로컬 컴퓨터는 127.0.0.1:8080)
//6_http_callback.js
const http = require("http");
const fs = require("fs");
//1- Callback 방식

//hello world 서버를 구현
const server = http.createServer((req, res) => {
	/*
	res.statusCode = 200;
	res.statusMessage = "OK";
	res.setHeader("content-type", "text/plain; charset=utf-8");
	*/
	//상태코드와 컨텐트 타입을 한번에 설정 가능
	//res.writeHead(200, {"content-type": "text/plain; charset=utf-8"});
	//res.write("hello, world");

	//HTML코드를 전송하려면 컨텐트 타입을 html로 설정
	res.writeHead(200, {"content-type": "text/html; charset=utf-8"});
	//res.write("<h1>hello, world</h1>");
	res.end();
});

//서버를 실행
server.listen(8080);	//포트 번호
console.log("server running...");

//위 구조에서 문제점은 무엇인가?
//하나의 코드에 View와 Controller가 같이 있다.
//HTML : View(화면에 표현)
//JS : Controller(요청에 대한 응답처리)
MVC 관점에서 View와 Controller를 분리해야 한다.
<!-- index.html -->
<!DOCTYPE html>
<html>
	<head>
		<meta charset="utf-8">
	</head>
	<body>
		<h1>
			Hello, This is index.html
		</h1>
	</body>
</html>
const http = require("http");
const fs = require("fs");
http.createServer((req,res) => {
res.writeHead(200, {"Content-type": "text/html; charset=utf-8"});
res.write(fs.readFileSync("./index.html"));
res.end();
}).listen(8080);
console.log("server running");
색인 index.html
웹 페이지 : 웹 서버안에 미리 작성되어 있는 문서 ex) HTML 문서(파일)
웹 사이트 : 웹 페이지들이 한 곳에 모여 있는 장소
인덱스 페이지 : 웹 사이트에 매번 처음으로 접속할 때마다 서버내의 파일을 보여주는 페이지
주소창에 www.naver.com -> www.naver.com/index.html
:: 웹 사이트 방문자 처음으로 보게 되는 웹 페이지
path 에 따라 다르게 페이지를 로딩하는 예
const http = require("http");
const fs = require("fs");

http.createServer((req,res) => {
	res.writeHead(200, {"Content-type": "text/html; charset=utf-8"});
	console.log("url: ", req.url);
	if(req.url === "/")
		res.write(fs.readFileSync("./index.html"));
	else if(req.url === "/about")
		res.write(fs.readFileSync("./about.html"));
	else if(req.url === "/contact")
		res.write(fs.readFileSync("./contact.html"));
	else {
		res.write(fs.readFileSync("./error.html"));
	}

	res.end();
}).listen(8080);

console.log("server running");
위 코드의 문제..
새로운 페이지를 추가해야 하는 요구사항이 들어올 때마다 기존 코드를 계속 수정해야 한다. 즉, 유지보수가 어렵다.
const responseMap = {
	"/" : __dirname + "/index.html",
	"/about" : __dirname + "/about.html",
	"/contact" : __dirname + "/contact.html",
	"/error" : __dirname + "/error.html"
};

http.createServer((req,res) => {
	const url = req.url;
	console.log("url: ", url);
	if(responseMap[url]) {
		res.writeHead(200, {"Content-type": "text/html; charset=utf-8"});
		res.end(fs.readFileSync(responseMap[url]));
	} else {
		res.writeHeader(404, {"content-type": "text/html; charset=utf-8"});
		res.end(fs.readFileSync("./error.html"));
	}
}).listen(8080);
Map 수정도 해야 하는 문제가 여전히 남아 있다.
//step3
const getViewPath = url => {
	if(url === '/') {
		url = "index";
	}
	return __dirname + `/${url}.html`;
}

http.createServer((req,res) => {
	const url = req.url;
	console.log("url: ", url);
	const viewPath = getViewPath(url);
	fs.readFile(viewPath, (err,data) => {
		if(err) {
			res.writeHeader(404, {"content-type": "text/html; charset=utf-8"});
			res.end(fs.readFileSync("./error.html"));
		}
		res.writeHead(200, {"Content-type": "text/html; charset=utf-8"});
		res.end(data);
	});
}).listen(8080);
console.log("server running");
Input 방식
<!-- input.html -->
<!DOCTYPE html>
<html>
	<head>
		<meta charset="utf-8">
	</head>
	<body>
		<h1>
			GET METHOD
		</h1>
		<!--<form action="/process_data">
			<p> <input type=text name="title"> </p>
			<p> <textarea name="content"></textarea> </p>
			<p> <input type="summit"></p>
			<p> <button> 제출 </button> </p>
		</form>
		-->
		<form action="/process_data" method="GET">
			이름:<input type="text" name="uname"><br>
			나이:<input type="number" name="uage"><br>
			<button> 입력 </button>
		</form>

	</body>
</html>
파이썬 서버 실행
#python3 -m http.server
파이썬은 포트가 8000번으로 실행

위 input.html 실행 > 이름/나이 입력 -> 입력 버튼

아래처럼 GET 방식으로 처리가 됨
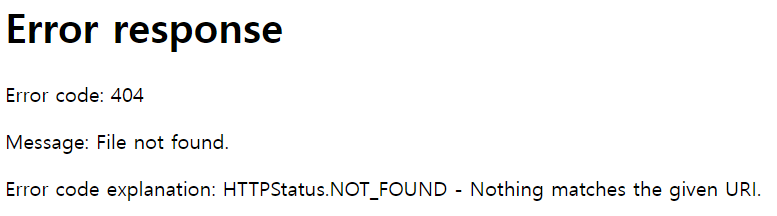
[24/Aug/2022 06:44:22] "GET /process_data?uname=23&uage=234 HTTP/1.1" 404
GET Method 의 param(query) 가져오는 예
//9_method.js

const http = require("http");
const fs = require("fs");
const url = require("url");
const qs = require("querystring");

http.createServer((req, res) => {
	//console.log(req);
	console.log(req.url);

	//req.url은 경로부터 시작되는 URL이다.
	//전체 URL을 가져오려면 아래와 같이 hostname + port 를 같이 넣어줘야 한다.
	const myUrl = new URL(req.url, "http://localhost:8080");

	if(req.url ==='/') {
		fs.readFile(__dirname + "/input.html", (err,data) => {
			res.writeHead(200, {"content-type": "text/html, charset=utf-8"});
			res.end(data);
		})
	}
//case 1
	/*else if(url.parse(req.url).pathname === "/input.do") {
		//URL의 쿼리를 파싱하여 이름과 나이를 출력하는 코드를 구현해보세요.
		const parsed = url.parse(req.url);
		const query = qs.parse(parsed.query);
		console.log(query.uname, query.uage);

		res.writeHead(200, {"content-type": "text/html, charset=utf-8"});
		res.end(`${query.uname}, ${query.uage}`);
	}*/
//case 2
	else if(myUrl.pathname === "/input.do") {
		const params = myUrl.searchParams;
		//console.log(params);	//URLSearchParams { 'name' => 'kakaroo', 'age' => '20' }
		console.log(params.get("uname"), params.get("uage"));	//kakaroo 20

		res.writeHead(200, {"content-type": "text/html, charset=utf-8"});
		res.end(`${params.get("uname")}, ${params.get("uage")}`);

	}

}).listen(8000);'Node.js' 카테고리의 다른 글
| Node.js - 수업 5일차 (0) | 2022.08.26 |
|---|---|
| Node.js - 수업 4일차 (0) | 2022.08.25 |
| Node.js - 수업 2일차 (0) | 2022.08.23 |
| Node.js - 수업 1일차 (0) | 2022.08.22 |