반응형

mustache 사용하기 위해
implementation('org.springframework.boot:spring-boot-starter-mustache')

-- footer.mustache --
<script src="https://code.jquery.com/jquery-3.3.1.min.js"></script>
<script src="https://stackpath.bootstrapcdn.com/bootstrap/4.3.1/js/bootstrap.min.js"></script>

<!--index.js 추가-->
<script src="/js/app/index.js"></script>
</body>
</html>
-- header.mustache --
<!DOCTYPE HTML>
<html>
<head>
    <title>스프링부트 웹서비스</title>
    <meta http-equiv="Content-Type" content="text/html; charset=UTF-8" />

    <link rel="stylesheet" href="https://stackpath.bootstrapcdn.com/bootstrap/4.3.1/css/bootstrap.min.css">
</head>
<body>
-- index.mustache --
{{>layout/header}}

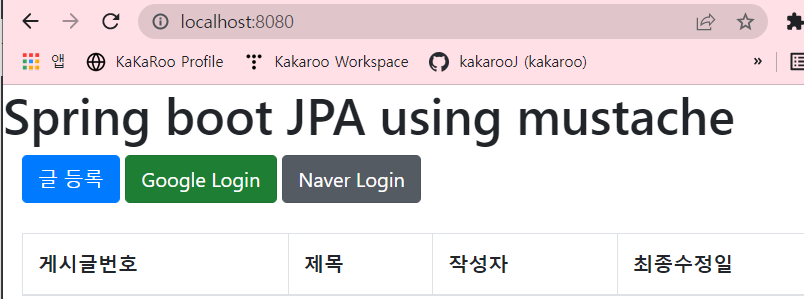
    <h1>Spring boot JPA using mustache</h1>
    <div class="col-md-12">
        <div class="row">
            <div class="col-md-6">
                <a href="/posts/save" role="button" class="btn btn-primary">글 등록</a>
                {{#userName}}
                    Logged in as: <span id="user">{{userName}}</span>
                    <a href="/logout" class="btn btn-info active" role="button">Logout</a>
                {{/userName}}
                {{^userName}}
                    <a href="/oauth2/authorization/google" class="btn btn-success active" role="button">Google Login</a>
                    <a href="/oauth2/authorization/naver" class="btn btn-secondary active" role="button">Naver Login</a>
                {{/userName}}
            </div>
        </div>
        <br>
        <!-- 목록 출력 영역 -->
        <table class="table table-horizontal table-bordered">
            <thead class="thead-strong">
            <tr>
                <th>게시글번호</th>
                <th>제목</th>
                <th>작성자</th>
                <th>최종수정일</th>
            </tr>
            </thead>
            <tbody id="tbody">
            {{#posts}}
                <tr>
                    <td>{{id}}</td>
                    <td><a href="/posts/update/{{id}}">{{title}}</a></td>
                    <td>{{author}}</td>
                    <td>{{#createdDate}}{{createdDate}}{{/createdDate}}
                        {{^createdDate}}Null{{/createdDate}}
                    </td>
                </tr>
            {{/posts}}
            </tbody>
        </table>
    </div>

{{>layout/footer}}
-- index.js --
var main = {
    init : function () {
        var _this = this;
        $('#btn-save').on('click', function () {
            _this.save();
        });

        $('#btn-update').on('click', function () {
            _this.update();
        });

        $('#btn-delete').on('click', function () {
            _this.delete();
        });
    },
    save : function () {
        var data = {
            title: $('#title').val(),
            author: $('#author').val(),
            content: $('#content').val()
        };

        $.ajax({
            type: 'POST',
            url: '/api/v1/posts',
            dataType: 'json',
            contentType:'application/json; charset=utf-8',
            data: JSON.stringify(data)
        }).done(function() {
            alert('글이 등록되었습니다.');
            window.location.href = '/';
        }).fail(function (error) {
            alert(JSON.stringify(error));
        });
    },
    update : function () {
        var data = {
            title: $('#title').val(),
            content: $('#content').val()
        };

        var id = $('#id').val();

        $.ajax({
            type: 'PUT',
            url: '/api/v1/posts/'+id,
            dataType: 'json',
            contentType:'application/json; charset=utf-8',
            data: JSON.stringify(data)
        }).done(function() {
            alert('글이 수정되었습니다.');
            window.location.href = '/';
        }).fail(function (error) {
            alert(JSON.stringify(error));
        });
    },
    delete : function () {
        var id = $('#id').val();

        $.ajax({
            type: 'DELETE',
            url: '/api/v1/posts/'+id,
            dataType: 'json',
            contentType:'application/json; charset=utf-8'
        }).done(function() {
            alert('글이 삭제되었습니다.');
            window.location.href = '/';
        }).fail(function (error) {
            alert(JSON.stringify(error));
        });
    }

};

main.init();
Audit
Java에서 ORM 기술인 JPA를 사용하여 도메인을 관계형 데이터베이스 테이블에 매핑할 때 공통적으로 도메인들이 가지고 있는 필드나 컬럼들이 존재합니다.
대표적으로 생성일자, 수정일자, 식별자 같은 필드 및 컬럼이 있습니다.
도메인마다 공통으로 존재한다는 의미는 결국 코드가 중복된다는 말과 일맥상통합니다.
데이터베이스에서 누가, 언제하였는지 기록을 잘 남겨놓아야 합니다.
그렇기 때문에 생성일, 수정일 컬럼은 대단히 중요한 데이터 입니다.
그래서 JPA에서는 Audit이라는 기능을 제공하고 있습니다.
Audit은 감시하다, 감사하다라는 뜻으로 Spring Data JPA에서 시간에 대해서 자동으로 값을 넣어주는 기능입니다.
도메인을 영속성 컨텍스트에 저장하거나 조회를 수행한 후에 update를 하는 경우 매번 시간 데이터를 입력하여 주어야 하는데, audit을 이용하면 자동으로 시간을 매핑하여 데이터베이스의 테이블에 넣어주게 됩니다.
-- BaseTimeEntity.java / Posts.java --
package com.kakaroo.intellij.springboot.domain;

import lombok.Getter;
import org.springframework.data.annotation.CreatedDate;
import org.springframework.data.annotation.LastModifiedDate;
import org.springframework.data.jpa.domain.support.AuditingEntityListener;

import javax.persistence.EntityListeners;
import javax.persistence.MappedSuperclass;
import java.time.LocalDateTime;

@Getter
//JPA entity 클래스들이 BaseTimeEntity를 상속할 경우 필드들도 칼럼으로 인식하도록 하다.
@MappedSuperclass
//BaseTimeEntity 클래스에 Auditing 기능을 포함시킨다.
@EntityListeners(AuditingEntityListener.class)
public abstract class BaseTimeEntity {

    @CreatedDate
    private LocalDateTime createdDate;

    @LastModifiedDate
    private LocalDateTime modifiedDate;
}

@Entity
public class Posts extends BaseTimeEntity {
..
}
-- Application.hava --
package com.kakaroo.intellij.springboot;

import org.springframework.boot.SpringApplication;
import org.springframework.boot.autoconfigure.SpringBootApplication;
import org.springframework.data.jpa.repository.config.EnableJpaAuditing;

// Java에서 ORM 기술인 JPA를 사용하여 도메인을 관계형 데이터베이스 테이블에 매핑할 때 공통적으로 도메인들이 가지고 있는 필드나 컬럼들이 존재합니다.
// 대표적으로 생성일자, 수정일자, 식별자 같은 필드 및 컬럼이 있습니다.
// 도메인마다 공통으로 존재한다는 의미는 결국 코드가 중복된다는 말과 일맥상통합니다.
// 데이터베이스에서 누가, 언제하였는지 기록을 잘 남겨놓아야 합니다. 그렇기 때문에 생성일, 수정일 컬럼은 대단히 중요한 데이터 입니다.
// 그래서 JPA에서는 Audit이라는 기능을 제공하고 있습니다. Audit은 감시하다, 감사하다라는 뜻으로 Spring Data JPA에서 시간에 대해서 자동으로 값을 넣어주는 기능입니다.
// 도메인을 영속성 컨텍스트에 저장하거나 조회를 수행한 후에 update를 하는 경우 매번 시간 데이터를 입력하여 주어야 하는데, audit을 이용하면 자동으로 시간을 매핑하여 데이터베이스의 테이블에 넣어주게 됩니다.
@EnableJpaAuditing
@SpringBootApplication
public class Application {

   public static void main(String[] args) {
      SpringApplication.run(Application.class, args);
   }

}
{{>layout/header}}

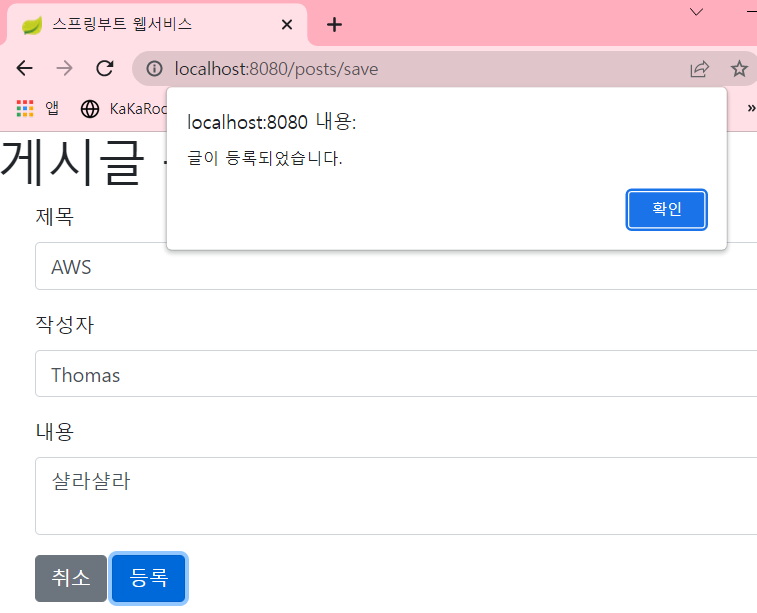
<h1>게시글 등록</h1>

<div class="col-md-12">
    <div class="col-md-4">
        <form>
            <div class="form-group">
                <label for="title">제목</label>
                <input type="text" class="form-control" id="title" placeholder="제목을 입력하세요">
            </div>
            <div class="form-group">
                <label for="author"> 작성자 </label>
                <input type="text" class="form-control" id="author" placeholder="작성자를 입력하세요">
            </div>
            <div class="form-group">
                <label for="content"> 내용 </label>
                <textarea class="form-control" id="content" placeholder="내용을 입력하세요"></textarea>
            </div>
        </form>
        <a href="/" role="button" class="btn btn-secondary">취소</a>
        <button type="button" class="btn btn-primary" id="btn-save">등록</button>
    </div>
</div>

{{>layout/footer}}


{{>layout/header}}

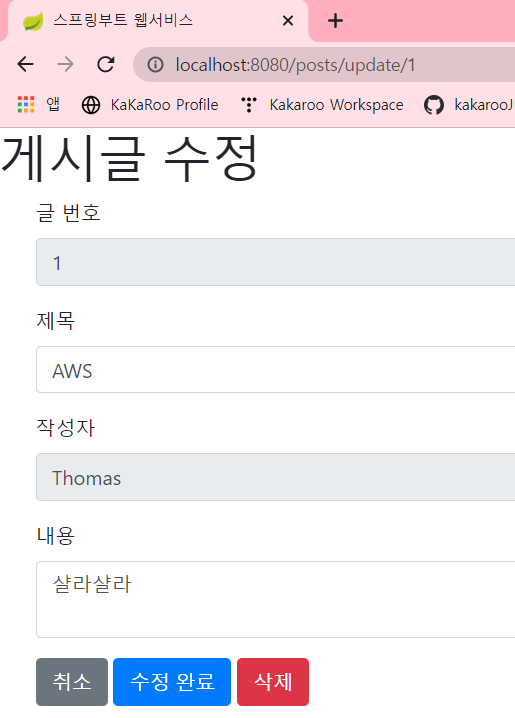
<h1>게시글 수정</h1>

<div class="col-md-12">
    <div class="col-md-4">
        <form>
            <div class="form-group">
                <label for="title">글 번호</label>
                <input type="text" class="form-control" id="id" value="{{post.id}}" readonly>
            </div>
            <div class="form-group">
                <label for="title">제목</label>
                <input type="text" class="form-control" id="title" value="{{post.title}}">
            </div>
            <div class="form-group">
                <label for="author"> 작성자 </label>
                <input type="text" class="form-control" id="author" value="{{post.author}}" readonly>
            </div>
            <div class="form-group">
                <label for="content"> 내용 </label>
                <textarea class="form-control" id="content">{{post.content}}</textarea>
            </div>
        </form>
        <a href="/" role="button" class="btn btn-secondary">취소</a>
        <button type="button" class="btn btn-primary" id="btn-update">수정 완료</button>
        <button type="button" class="btn btn-danger" id="btn-delete">삭제</button>
    </div>
</div>

{{>layout/footer}}

반응형
'Web' 카테고리의 다른 글
| Android에서 SpringBoot JPA 서버와 연동하기 (0) | 2022.02.17 |
|---|---|
| Spring Boot - Eclipse Maven으로 Spring Web Layer 실습 (0) | 2022.02.14 |
| Spring Web Layer (공사중...) (0) | 2022.02.07 |
| JPA(Java Persistence API) vs Mapper (0) | 2022.02.07 |
| 2 - Spring Boot - JPA 구현 by Spring Web Layer (0) | 2022.02.07 |